
Is your toilet seat loose, cracked, stained beyond cleaning, or just an eyesore in your otherwise pristine bathroom? Replacing it is one of the easiest, most cost-effective DIY home improvements you can tackle. You don’t need to be a master plumber; with a few basic tools and about 15 minutes, you can have a fresh, new seat installed.
This definitive guide will walk you through how to replace a toilet seat of any type. We’ll cover everything from identifying your current hardware to choosing the perfect replacement and executing a flawless installation. Let’s turn that bathroom frown upside down.
Why Replace Your Toilet Seat? The Unignorable Signs
Before we dive into the how, let’s confirm the why. Here are the most common reasons to undertake this quick project:
-
Cracks or Damage: A cracked seat is uncomfortable and a hygiene concern.
-
Stains and Discoloration: Over time, especially with cheaper plastic seats, stains can become permanent.
-
Loose Hinges: Constant wobbling is annoying and can damage the toilet bowl’s porcelain.
-
Aesthetic Upgrade: Matching your seat to a new bathroom decor or simply modernizing the look.
-
Functional Improvement: Upgrading to a soft-close toilet seat to eliminate loud slamming—a true household peacekeeper.
Step 1: Gather Your Tools and Materials
You won’t need a full toolbox. Here’s your likely list:
-
New Toilet Seat: Ensure it’s the correct shape and size (more on this below).
-
Basic Tools: Adjustable wrench, screwdriver (flat-head and/or Phillips), and a pair of pliers.
-
Penetrating Oil (like WD-40): For stubborn, rusted bolts.
-
Sponge and Towel: For cleanup.
-
A Flashlight: To see those hidden fixings or bolts underneath the bowl.
Step 2: The Most Critical Step – Measure and Choose the Right Seat
This is the secret to a seamless project. A wrong-sized seat will look terrible and function poorly.
-
Determine the Shape: Toilets are either round or elongated (oval). Measure from the center of the hinge bolts to the very front of the bowl. Round bowls are typically about 16.5 inches, while elongated are about 18.5 inches. When in doubt, snap a picture with your phone to take to the store.
-
Measure the Bolt Spread: This is the distance between the two hinge bolts that attach the seat to the toilet. The standard is about 5.5 inches, but it can vary. Measure from the center of one bolt to the center of the other.
-
Choose Your Features:
-
Standard vs. Soft-Close: Replacing a toilet seat with a soft close mechanism is highly recommended. It prevents slamming and is safer for families with kids.
-
Material: Plastic is common; molded wood (with a coating) is sturdy; and cushioned seats exist but are less hygienic long-term.
-
Hinge Type: Consider quick-release hinges for easy cleaning, where the seat lifts off the posts.
-
Pro Tip: If you’re shopping at a hardware store like Bunnings, take these measurements with you. Staff can help you find the perfect match, and you can often find the specific toilet seat screws or kits you might need.
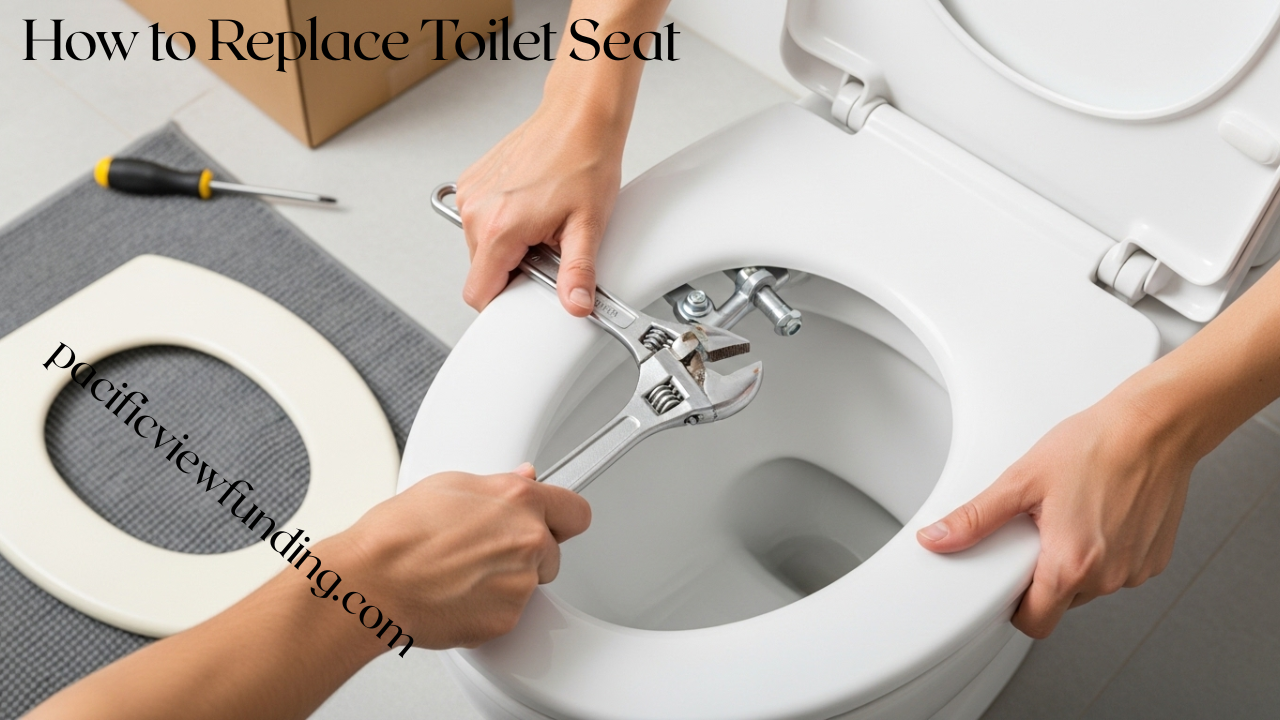
Step 3: Removing the Old Toilet Seat – Conquering Every Fastener Type
Removal is often the trickiest part, especially with older seats. Here’s how to handle every scenario.
Scenario A: The Standard Plastic Caps (Most Common)
-
Look for two plastic caps at the back of the seat, covering the bolt heads.
-
Insert a flat-head screwdriver into the small notch on the cap and gently pry it open.
-
Underneath, you’ll see a plastic or metal nut. Use your wrench or pliers to hold the bolt head steady on top while you unscrew the nut from underneath the toilet bowl.
-
Once the nut is off, the bolt should slide out, freeing the seat.
Scenario B: How to Remove a Toilet Seat with Hidden Bolts
This is a common modern design.
-
Look for a small button or lever on the side or underside of the hinge.
-
Press the button or slide the lever. This often allows the top part of the hinge (and the seat) to lift directly off.
-
If it doesn’t lift, you may need to unscrew a security screw first. Once the seat is off, you’ll access the bolts to remove the hinge posts from the bowl.
Scenario C: How to Remove a Toilet Seat from the Bottom (Rusted or Stubborn Bolts)
Sometimes, the top plastic caps are missing or the bolt heads are stripped. Your only access is from underneath.
-
Shine your flashlight under the back of the toilet bowl. You’ll see two metal or plastic nuts.
-
Use an adjustable wrench to grip the nut. You may need to use a second tool to hold the bolt head on top to prevent it from spinning. If it’s a plastic wingnut, you can often turn it by hand.
-
If it’s rusted solid, apply penetrating oil to the threads from underneath, wait 10 minutes, and try again.
Scenario D: How to Remove a Toilet Seat with No Visible Screws
These are typically “top-fix” or “concealed hinge” models. The fixing mechanism is accessed from the top, right near the hinge.
-
Open the seat and look closely where the seat attaches to the hinge posts. There may be a small plastic cover.
-
Pop this cover off with a screwdriver to reveal a screw.
-
Unscrewing this will release the seat from the post. You may then need to unscrew the posts themselves from the bowl.
Step 4: Installing Your Brand New Toilet Seat
With the old seat gone and the area wiped clean, it’s time for the rewarding part.
-
Position the New Hinges: Align the new seat’s hinge holes with the holes on the toilet bowl. The bolts (usually included) will drop through.
-
Attach from Underneath: From under the bowl, slide on the washer and hand-tighten the nut onto the bolt. Many modern seats come with plastic nuts and bolts that are designed to be tightened by hand or with a simple tool provided.
-
The Tightening Balance: This is crucial. Tighten the nuts firmly with your wrench or the provided tool until the seat is secure and does not wiggle. DO NOT OVERTIGHTEN. You are tightening against porcelain, which can crack under extreme force. Snug is enough.
-
Attach the Seat to Hinges (if applicable): For seats with separate hinges or quick-release systems, simply click or screw the seat onto the now-secure hinge posts according to the manufacturer’s instructions.
-
Test and Adjust: Open and close the seat and lid. Ensure it stays in the “up” position if designed to do so. Make minor adjustments to the hinge tension if your model allows it.
Note on Hardware: If the old bolts were corroded, always use the new hardware provided with your seat. If you need to buy replacement toilet seat screws or hinges separately, ensure they are the correct size and material (stainless steel is best for rust resistance).
Step 5: Final Checks and Cleanup
-
Give the seat a firm (but gentle) side-to-side test to confirm it’s stable.
-
Wipe down the entire toilet and seat to remove any fingerprints or dust from installation.
-
Step back and admire your work! You’ve just upgraded your bathroom.
Frequently Asked Questions (FAQs)
Q: Can I replace a toilet seat myself?
A: Absolutely. It’s one of the simplest DIY tasks. If you can use a wrench and a screwdriver, you have all the skills necessary.
Q: How do I find the correct replacement toilet seat?
A: As outlined in Step 2, the two key measurements are the bowl shape (round vs. elongated) and the bolt spread (distance between the hinge holes). Taking a photo of your old seat can also be very helpful.
Q: How do I remove a toilet seat with hidden bolts?
A: Look for a release button, lever, or a small cover on the hinge itself. Activating this usually allows the seat to detach, revealing the bolts for removal.
Q: Can all toilet seats be replaced?
A: Yes, universally. All standard residential toilets have replaceable seats. The process might differ slightly based on the hinge style, but a replacement exists for every model.
Q: Is it worth upgrading to a soft-close seat?
A: For most people, yes. The comfort, quietness, and safety (no pinched fingers) make it a highly valued, low-cost upgrade that you’ll appreciate every single day.
Your Bathroom Refresh Starts Now
You now possess the complete knowledge to confidently replace any toilet seat. No more wobbling, staining, or slamming lids—just a fresh, functional, and clean result that makes your bathroom feel instantly renewed.
Ready to begin your project? Head to your local hardware store or browse online with your measurements in hand. Treat yourself to that soft-close seat you’ve been considering. In less time than it takes to watch a sitcom, you’ll have completed a satisfying upgrade that adds both function and style to your home.