
CapCut PC is a powerful video editing tool that opens up a world of creativity. Among its many features, splicing overlays can truly elevate your projects. Whether you’re looking to add dynamic elements or create seamless transitions between clips, mastering this technique can make all the difference in your videos. In this guide, we’ll explore how to splice overlay on CapCut PC effectively and efficiently. Get ready to take your editing skills to the next level!
How to Splice Overlay on CapCut PC
To splice an overlay in CapCut PC, start by importing your video and overlay clips into the project. Drag your main video to the timeline. Then, add the overlay clip above it on a separate track.
Next, select the overlay clip. Use the trimming tool to adjust its length so it fits perfectly with your main footage. Position it at the desired spot on the timeline where you want it to appear.
Apply any necessary effects or adjustments for better integration. You can experiment with opacity and blending modes to achieve that seamless look you’re aiming for in your project.
Introduction
Creating engaging videos often involves layering multiple clips to craft a compelling story. One powerful technique for achieving this is splicing overlays in CapCut on PC. This method allows you to enhance your visuals by combining different media seamlessly.
CapCut has gained popularity for its user-friendly interface and robust editing features. Whether you’re working on a vlog, tutorial, or creative project, knowing how to splice overlays can elevate your content significantly.
In this guide, we’ll walk you through the process step-by-step while providing tips and tricks to maximize your video’s impact using CapCut’s overlay function.
Overview of Splicing Overlay in CapCut
Splicing overlays in CapCut allows users to combine different video elements seamlessly. This feature enhances storytelling by layering visuals and creating dynamic effects.
With overlays, you can emphasize key moments or add creative touches that make your videos stand out. It’s an essential tool for both beginners and seasoned editors looking to elevate their projects.
CapCut’s user-friendly interface makes it easy to navigate through overlay options, ensuring a smooth editing experience. Whether you’re adding text, images, or clips, mastering this technique can significantly enhance your video’s overall appeal.
Step-by-Step Guide to Splicing Overlay on CapCut PC
To splice an overlay in CapCut PC, start by importing your clips into the project. Drag your main video to the timeline. Then, add your overlay clip on a separate layer above it.
Next, select the overlay clip and position it where you want it to appear in the video. Use the cut tool found in the toolbar to slice away any unwanted portions of the overlay.
Adjust its duration by dragging its edges along the timeline. Play around with effects and transitions for better integration with your main footage. Enjoy experimenting!
Tips and Tricks for Effective Overlay Splicing
When splicing overlays in CapCut, consider your clips’ timing. Syncing overlays with the audio or main video enhances engagement. Use the preview feature to fine-tune this aspect effectively.
Experiment with different overlay styles and effects. Don’t be afraid to mix opacity levels for a smoother blend. Creative transparency can create captivating visuals that catch the viewer’s eye.
Utilize keyframes for dynamic movement within your overlays. This adds depth to your project and keeps it visually interesting. Small adjustments can transform static elements into compelling animations that elevate your overall presentation.
Troubleshooting Common Issues in Splicing Overlay on CapCut PC
When splicing overlays in CapCut PC, you may encounter a few hiccups. One common issue is that the overlay might not align correctly with the main video. Make sure to adjust its position and size using the editing tools available.
Another problem can arise from lagging or freezing during playback. This often happens due to high-resolution files or insufficient system resources. Try reducing the resolution of your project temporarily for smoother performance.
If an overlay isn’t appearing at all, check whether it’s enabled on your timeline. Sometimes toggling visibility off and on can resolve this frustrating glitch quickly.
FAQS
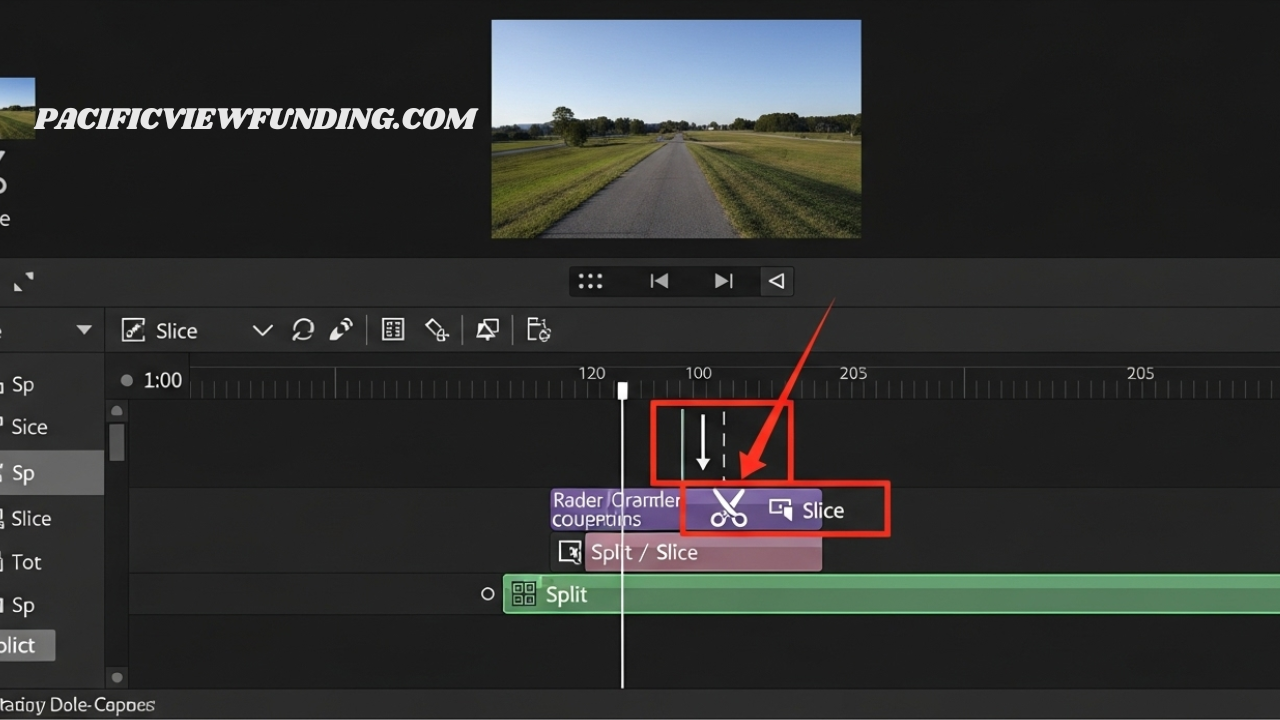
Many users wonder where the splice option is in CapCut PC. You can easily find it in the toolbar on the left side, typically represented by a scissors icon. This feature allows you to cut and organize your clips seamlessly.
If you’re curious about splitting overlays, it’s straightforward. Select your overlay clip on the timeline, then use the same splice tool to divide it into sections as needed.
To merge overlays together, simply select multiple overlay clips while holding down “Ctrl” and right-clicking them. Choose the merge option from the dropdown menu for a cohesive look in your project.
Where is the splice option in CapCut PC?
Finding the splice option in CapCut PC is straightforward. Once you open your project, look for the timeline area where your clips are displayed.
The splice tool is located within the editing menu on the right-hand side of the screen. You’ll see various options that help you manipulate your video layers.
To access it, simply click on a clip in your timeline. The editing features will appear, allowing you to select “Splice” and adjust how overlays interact with each other seamlessly. It’s designed to enhance your creative process easily.
How to split overlays in CapCut?
To split overlays in CapCut, start by selecting the overlay you want to modify. Click on it in your timeline to activate the editing options.
Next, position the playhead at the point where you wish to split. This will help you achieve precise control over your edit.
Look for a scissor icon or “Split” option in the toolbar and click it. Your selected overlay will now be divided into two segments, allowing for further adjustments or edits as needed.
How to make a clip an overlay in CapCut PC?
To make a clip an overlay in CapCut PC, start by importing your desired video into the timeline. Click on the “Overlay” tab located on the left sidebar to access overlay options.
Next, drag and drop your selected clip onto the overlay track above your main video layer. This action will create a new overlay instance that you can manipulate independently from the background footage.
Adjust its size and position as needed. You can use rotation or cropping tools for perfect alignment with your primary content. Enjoy experimenting with different overlays to enhance your videos!
How to merge overlays together in CapCut?
Merging overlays in CapCut PC is a straightforward process that enhances your video editing capabilities. First, ensure you have multiple overlay clips on the timeline. Select the first overlay, then hold down the Shift key and click to select additional overlays. Once highlighted, right-click and choose “Merge” from the context menu.
This will combine your selected overlays into one cohesive layer. You can adjust this merged clip’s position or apply effects as needed for a seamless look in your project. Experiment with different combinations to make your videos even more dynamic and visually appealing!