
Introduction
In today’s digital landscape, application performance directly impacts user satisfaction, conversion rates, and business revenue. Without clear performance benchmarks, teams operate in the dark, unsure whether their applications will withstand real-world demands. This is where Service Level Agreements (SLAs) transform from contractual formalities into actionable performance targets. When integrated with a powerful tool like NeoLoad, SLAs move from theoretical documents to measurable, enforceable metrics that guide development and operations.
This comprehensive guide will walk you through everything you need to know about configuring SLAs in NeoLoad, from basic setup to advanced monitoring strategies. Whether you’re new to performance testing or looking to refine your existing processes, mastering how to set SLA in NeoLoad will elevate your testing maturity and ensure your applications meet business expectations.
Key Takeaways:
-
Define clear performance thresholds aligned with business goals.
-
Use percentile-based metrics (e.g., 90th/95th) for realistic user experience insights.
-
Set tiered severity levels to prioritize critical issues.
-
Apply SLAs to key transactions, not every action, to avoid noise.
-
Regularly review and adjust SLAs as your application evolves.
Understanding SLA Fundamentals: More Than Just Numbers
Before diving into the technical setup, it’s crucial to understand what SLAs represent in the context of performance testing.
What are SLA settings in performance testing?
SLA settings are predefined performance thresholds that determine whether your application meets acceptable standards under load. Unlike basic pass/fail criteria, SLAs in tools like NeoLoad provide granular monitoring across multiple dimensions of performance, including:
-
Response time percentiles (90th, 95th, 99th)
-
Error rates and success percentages
-
Throughput and transaction rates
-
Server resource utilization
-
Component-specific performance metrics
These settings serve as your application’s “vital signs” during load tests, immediately highlighting when performance degrades beyond acceptable limits.
Prerequisites: Preparing to Configure SLA in NeoLoad
Successful SLA configuration begins before you open NeoLoad. Ensure you have:
-
Clear Business Requirements: Work with stakeholders to define what “good performance” means for your specific application. Is a 3-second page load acceptable, or must it be under 2 seconds?
-
Baseline Metrics: If possible, gather current performance data from production or staging environments to establish realistic benchmarks.
-
Test Design Completion: Your NeoLoad test scenario should be largely designed, including virtual user paths, think times, and pacing.
-
Monitoring Points Identified: Know which transactions, pages, or processes are most critical to measure.
With these foundations in place, you’re ready to begin the actual configuration process.
Step-by-Step Guide: How to Set Up SLA in NeoLoad
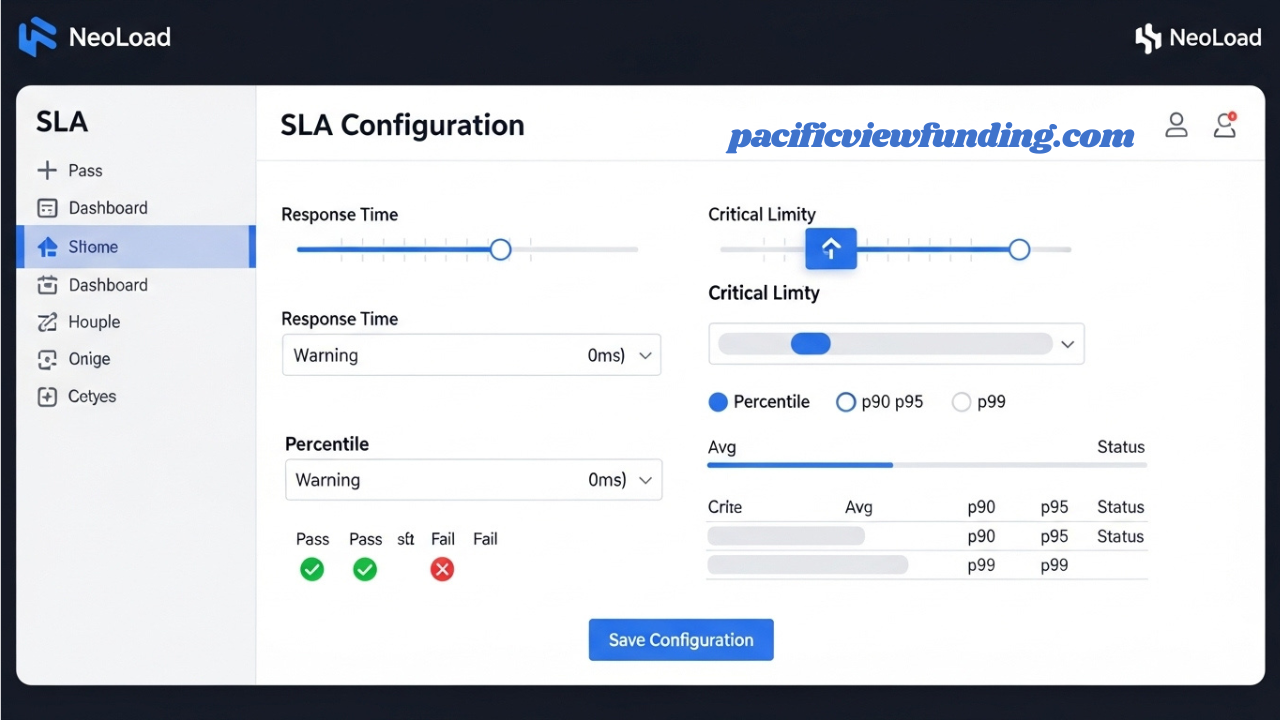
Step 1: Accessing the SLA Configuration Interface
-
Open your NeoLoad project and navigate to your test scenario.
-
In the Design section, locate and select the SLAs tab in the bottom panel. If it’s not immediately visible, you may need to enable it via View → Show SLA.
-
You’ll see the SLA management interface, typically displaying existing SLAs (if any) and providing options to add new ones.
THE 2: Creating Your First SLA Definition
-
Click Add SLA or the plus (+) icon to create a new SLA.
-
The SLA configuration dialog will appear with several key sections:
Basic Information:
-
Name: Choose a descriptive name (e.g., “Login_Transaction_Under_2s”)
-
Description: Optional but recommended for team clarity
-
Severity Level: Typically Info, Warning, or Critical
Measurement Scope:
-
Specify whether the SLA applies to the entire test, specific user paths, individual pages, or specific requests.
-
You can apply SLAs to containers (groups of actions) for broader monitoring.
Condition Configuration:
This is where you define your performance thresholds. NeoLoad offers several condition types:-
Average Response Time: The mean time for the selected element
-
Percentile Response Time: More useful for real-world expectations (e.g., “90% of responses under 3 seconds”)
-
Error Rate: Percentage of failed transactions
-
Hits per Second: Throughput requirements
-
Custom Calculations: Using NeoLoad’s expression language
-
Step 3: Configuring Threshold Values and Logic
When learning how to configure SLA in NeoLoad, threshold setting is the most critical skill:
-
For Response Time SLAs:
-
Select either “Average” or “Percentile” measurement
-
Set the threshold value (e.g., 2000 milliseconds)
-
Choose the operator: Typically “less than” for response times
-
For percentile measurements, specify which percentile (90, 95, or 99)
-
-
For Error Rate SLAs:
-
Select “Error Rate” as the measurement
-
Set threshold as a percentage (e.g., 0.5 for 0.5%)
-
Use “less than” operator to trigger when errors exceed your threshold
-
-
Advanced Configuration Options:
-
Sampling Interval: Control how frequently NeoLoad evaluates the SLA
-
Warm-up Period: Exclude initial test time from SLA evaluation
-
Condition Aggregation: Define whether ALL conditions must fail or ANY single condition failing triggers the SLA violation
-
Step 4: Applying and Organizing Multiple SLAs
Complex applications require multiple SLAs monitoring different aspects:
-
Create a Hierarchical Structure:
-
Group related SLAs (e.g., all checkout process SLAs)
-
Use naming conventions for easy identification
-
Set appropriate severity levels based on business impact
-
-
Balance Coverage and Clarity:
-
Avoid creating hundreds of SLAs that create noise
-
Focus on critical user journeys and business transactions
-
Include both user-facing metrics (response times) and system metrics (error rates)
-
Best Practices for Effective SLA Configuration in NeoLoad
Align SLAs with Business Objectives
Your SLAs should reflect actual user expectations and business requirements, not arbitrary technical limits. Collaborate with product owners to establish meaningful thresholds that balance user experience with technical feasibility.
Use Percentile-Based Measurements
While average response times are easier to understand, percentile measurements (particularly 90th or 95th percentile) better represent actual user experience. If your 95th percentile response time is under 3 seconds, you’re guaranteeing that 95% of users experience that performance level.
Implement Tiered Severity Levels
Not all SLA violations are equal. Configure your NeoLoad SLAs with appropriate severity:
-
Critical: Core functionality failures or extremely poor performance
-
Warning: Performance degradation that warrants investigation
-
Info: Performance tracking for non-critical components
Include Warm-up Periods
Performance tests often show irregular behavior during initial ramp-up. Configure your SLAs in NeoLoad to exclude the first few minutes of test execution to avoid false violations during stabilization.
Regularly Review and Adjust
As applications evolve, so should their performance targets. Schedule regular reviews of your SLA configurations in NeoLoad to ensure they remain relevant and challenging.
Common Pitfalls When Setting SLA in NeoLoad
Setting Overly Aggressive Targets
While aiming for excellent performance is admirable, unrealistic SLAs create constant “violations” that teams learn to ignore. Base initial targets on current performance plus incremental improvements.
Monitoring Too Many Elements
Resist the temptation to create an SLA for every transaction. Focus on critical user paths and business functions to maintain signal clarity.
Ignoring Environmental Factors
Remember that SLAs measured in test environments may differ from production. Account for environmental differences when setting thresholds or establish environment-specific SLA targets.
Forgetting About Mobile Performance
If your application serves mobile users, consider creating separate SLAs with different thresholds that account for variable network conditions.
Advanced SLA Configuration: Beyond the Basics
Using Custom Metrics and Calculations
NeoLoad’s powerful expression language allows for sophisticated SLA conditions:
-
Ratios between different metrics
-
Compound conditions (response time AND success rate)
-
Trend-based evaluations (performance degradation over time)
Integrating with CI/CD Pipelines
Configure your NeoLoad SLAs to provide pass/fail status to your continuous integration system. This enables automatic performance gating, preventing performance regressions from reaching production.
Creating SLA Templates
For organizations running multiple similar tests, develop SLA templates that can be imported and adapted across projects, ensuring consistency in performance monitoring.
Analyzing SLA Results in NeoLoad
After executing your load test, NeoLoad provides comprehensive SLA reporting:
-
SLA Status Overview: Quick view of which SLAs passed or failed
-
Trend Analysis: How SLA compliance changed throughout the test
-
Drill-down Capabilities: Investigate the root cause of specific violations
-
Comparison Tools: Evaluate SLA compliance across different test runs
Learn to interpret these reports not just as pass/fail indicators, but as diagnostic tools for understanding application behavior under load.
Conclusion: Transforming Performance Testing with SLAs
Mastering how to set SLA in NeoLoad represents a significant advancement in your performance testing maturity. It moves testing from “does it work?” to “does it work well enough for our users and business?” By implementing thoughtful, well-configured SLAs, you create:
-
Clear Performance Standards: Everyone understands what “good” means
-
Early Warning Systems: Potential issues are flagged before users are impacted
-
Objective Quality Gates: Performance becomes a measurable, enforceable requirement
-
Business-Technology Alignment: Technical performance directly ties to business outcomes
The process of configuring SLAs in NeoLoad is both an art and a science—requiring technical understanding of the tool, statistical knowledge about performance measurements, and business acumen to set appropriate targets.
Your Next Steps: From Reading to Implementation
Now that you understand the principles and procedures for setting up SLAs in NeoLoad, it’s time to put this knowledge into practice:
-
Start Small: Configure 3-5 critical SLAs for your next load test rather than attempting to monitor everything at once.
-
Collaborate: Review your SLA thresholds with both technical teams and business stakeholders.
-
Iterate: Use initial results to refine your SLA configurations, adjusting thresholds and conditions based on actual test outcomes.
-
Document: Create internal guides documenting your organization’s approach to SLA configuration in NeoLoad.